Hello! I've decided to make a tutorial showing how I made the Advent calendar from my previous blog entry, in case anyone would like to make one of their own. ") I hope you will find it helpful!
I hope you will find it helpful!
For the background I cut a rectangle 18 in. wide by 24 in. long (45.7 cm wide by 60.9 cm long). For the pockets I cut 25 squares 3 in. wide by 3 in. long (7.6 cm wide by 7.6 cm long). You can make yours larger or smaller if you like, just be sure to keep the proportions accurate.

Follow the same steps again to sew the edges of each of the 25 pockets together.

You can also glue some glitter onto the pockets like I did if you want, but be careful not to get it on the seams, where you'll be sewing in the next step.

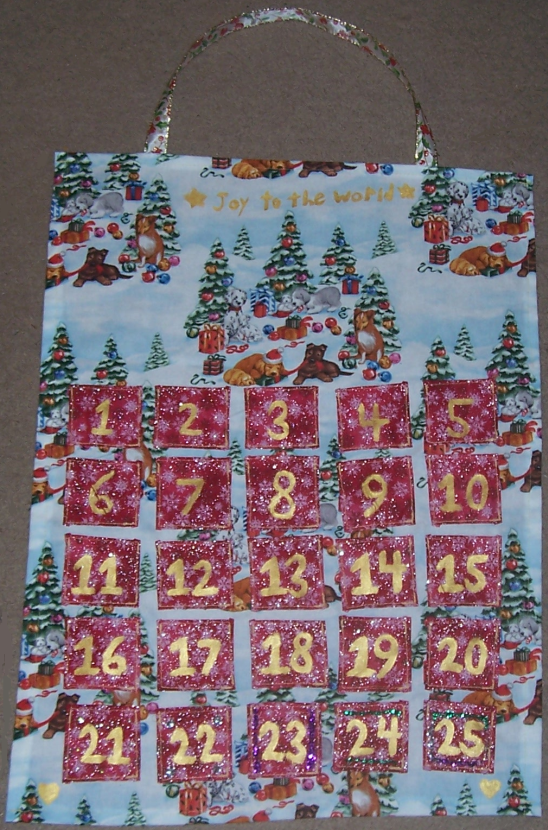
Step 4-Sewing on the PocketsNow it's time to sew the pockets onto the background, but before you do that you may want to lay them out onto the fabric and find the best places to sew them on. I arranged mine in five rows of five; the pockets on the sides and bottom are 1 in. (2.5 cm) away from where I sewed on the background. All of the pockets are about 1/2 in. (1.2 cm) away from each other, with the five in the middle row being slightly closer to the ones beside them. Depending on the size of your Advent calendar, you may need to arrange them differently.
Pin and then sew the sides and bottom of the pockets to the background, but leave the tops open. You could use a decorative stitch for this step; but I just went with a straight stitch since I have more experience with that.

Fold the two edges of the ribbon and carefully pin and sew them in place. Then place them on the back of your Advent calendar in the proper position, and pin and sew in place.
Make sure you sew the ribbon on so that you see the front of it when the Advent calendar faces forward. You can place the ends of the ribbon on the edges of the background, or you can place them more in the middle like I did. I placed mine 3 1/2 in. (8.9 cm) away from each side.

Now your Advent calendar is complete! Congrats! Hang it up on the wall, put a piece of candy in each pocket, and admire it through the Advent season. (You'll want to put something on the corners of your Advent calendar to hold it in place on the wall, though.)
I hope you found this tutorial useful for making a new craft you'll enjoy this holiday season. Thanks for reading and happy sewing!
I hope you will find it helpful!Materials
For one Advent calendar, you will need:- Two pieces of fabric (One for the background and one for the pockets. I bought a yard of the background fabric and a half-yard of the pocket fabric and had plenty left over. A half-yard of each is probably enough. You can probably use other kinds of fabric, but I used flannel because it doesn't fray too much and is easy to sew.)
- Ribbon
- Thread (Make sure you have plenty! I used the same color of thread for almost the entire project and I used almost the whole spool.)
- Scissors that will cut fabric or rotary cutter and cutting mat
- Pins
- Paint/embroidery thread/glitter/etc. for decorating
- Sewing machine (You may be able to hand-sew this too, but I'd recommend using a machine.)
- Fabric marker for marking the fabric
- Ruler
Step 1-Cutting the Fabric
All of the pieces for this project are squares and rectangles, so you don't need a pattern. Use a ruler and a fabric marker to draw the cutting lines (make the marks on the back of the fabrics and make sure they don't show up on the front).For the background I cut a rectangle 18 in. wide by 24 in. long (45.7 cm wide by 60.9 cm long). For the pockets I cut 25 squares 3 in. wide by 3 in. long (7.6 cm wide by 7.6 cm long). You can make yours larger or smaller if you like, just be sure to keep the proportions accurate.
Step 2-Sewing the Edges
Fold the edges of the sides of the background fabric and use several pins to hold each side in place. Then, sew them in place with a straight stitch. Remember to take the pins out when you get close to them. Then, follow the same steps with the edges of the top and bottom of the fabric.Follow the same steps again to sew the edges of each of the 25 pockets together.
Step 3-Decorating the Pockets
Next you can decorate the pockets however you like. For the numbers, you can use appliques, embroider them, draw them on with a marker that will show up, or you can paint them on like I did. I actually used a model paint for mine because I liked its color, but there are probably other kinds of paint you can use.You can also glue some glitter onto the pockets like I did if you want, but be careful not to get it on the seams, where you'll be sewing in the next step.
Step 4-Sewing on the Pockets
Pin and then sew the sides and bottom of the pockets to the background, but leave the tops open. You could use a decorative stitch for this step; but I just went with a straight stitch since I have more experience with that.
Step 5-Sewing on the Handle
Next, make a handle for your Advent calendar to hang it up with. Use a sturdy ribbon; before cutting it, hold it up to your Advent calendar to find the length you want it to be, and then cut it slightly longer than that.Fold the two edges of the ribbon and carefully pin and sew them in place. Then place them on the back of your Advent calendar in the proper position, and pin and sew in place.
Make sure you sew the ribbon on so that you see the front of it when the Advent calendar faces forward. You can place the ends of the ribbon on the edges of the background, or you can place them more in the middle like I did. I placed mine 3 1/2 in. (8.9 cm) away from each side.
Step 6-Finishing
If you want to decorate your Advent calendar's background at all, you can do that now. I painted the words "Joy to the World", two stars, and two hearts on mine, but there are many more options than that. Be creative and have fun!Now your Advent calendar is complete! Congrats! Hang it up on the wall, put a piece of candy in each pocket, and admire it through the Advent season. (You'll want to put something on the corners of your Advent calendar to hold it in place on the wall, though.)
I hope you found this tutorial useful for making a new craft you'll enjoy this holiday season. Thanks for reading and happy sewing!